RowLayout Manager
Java uses the concept of "layout managers" to handle how visual components are placed on your user's screen. There are a number of standard layout managers supplied with Java, but none of them handles standard business applications well.
JGuiGen uses a layout manager called a "rowlayout." This is a highly modified version of the manager described in the book "Object Oriented Java".
The row layout divides the screen into two sections - A) the label column and B) the rest of the columns

When you create a rowlayout manager it defaults to 3 pixels between each column and the borders. You can change this.
In you program you add components indicating which row and column you want the item to be in. (Almost) everthing that goes into column 0 is assumed to be a label. When you ask the system to display the screen, the system automatically finds the widest label and sizes the "Label Column" to handle that component.
The system then goes through all of your rows and determines which row has the most "other columns." It then automatically divides the "Other Columms" portion of the screen into equal parts based on that number. You always have one label-column but your might have 2, 3 or 6 or 8 "other columns."
When you add components to a row, you also indicate how many columns to want the component to take up and whether you want the component to "Fill" all available space or take its standard size and shape ("nofill"). Items in the label column as assumed to fill one column.
The little add method returns the next available column.
Here is an example:
int row = 0;
int col = 0;
JLabel jL1 = new JLabel("Label 1");
col = add(jL1,row,col, 1, nofill);
JTextField jt1 = new JTextField();
jt1.setText("This is the first text box");
col = add(jt1, row, col,2, fill);
// note col now contains the value of 3.
row++; // note we bumped the row by one
col=0; // note we set the col back to zero
JLabel jL2 = new JLabel("First/Last");
col = add(jL2,row,col, 1, nofill);
JTextField firstName = new JTextField();
firstName.setText("Hale");
col = add(lastName, row, col,1, fill);
JTextField lastName = new JTextField();
firstName.setText("Pringle");
col = add(lastName, row, col,1, fill);
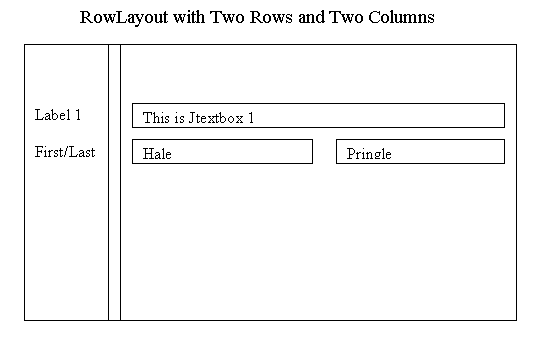
Notes: Both row resolved to two "other" columns. The first row had one component that was two columns wide and the other row had two components, each of which was one column wide.
Here is one more sample:
int row = 0;
int col = 0;
JLabel jL1 = new JLabel("Label 1");
col = add(jL1,row,col, 1, nofill);
JTextField jt1 = new JTextField();
jt1.setText("This is the first text box");
col = add(jt1, row, col,4, fill); //note the 4 in the width column
// note col now contains the value of 5.
row++; // note we bumped the row by one
col=0; // note we set the col back to zero
JLabel jL2 = new JLabel("First/Last");
col = add(jL2,row,col, 1, nofill);
JTextField firstName = new JTextField();
firstName.setText("Hale");
col = add(lastName, row, col,2, fill); // note the 2 in the width column
JTextField lastName = new JTextField();
firstName.setText("Pringle");
col = add(lastName, row, col,2, fill); // note the 2 in the width column
row++; // note we bumped the row by one
col=0; // note we set the col back to zero
JLabel jL3 = new JLabel("City/State");
col = add(jL3,row,col, 1, nofill);
JTextField cityName = new JTextField();
cityName.setText("Orlando");
col = add(cityName, row, col,2, fill); // note the 2 in the width column
JTextField stateName = new JTextField();
stateName.setText("FL");
col = add(stateName, row, col,1, fill);

Notes: Now the first two row have four columns and the last one only has three. The screen is divided into four columns and the first TextField uses all four. The next three textfields use two each amd the last one only uses one.
Special considerations.
If you place a "-1" in the fourth postion (the "how many columns wide should this be" column), the component will use the maximum number available. I usually put scrolling JTables in column zero and give them a width of -1.
In some cases (for example when you have address, city, state fields), you would like one of the columns to be much smaller than the rest. You can indicate the address field and the city field are each 4 columns wide and the state is one column wide. This will divide the "Other columns" section into 7 columns and the adress and city fields will be 3 times wider than the state field.
Sometimes you would like to force some components to fill one column. You can place them inside a JPanel and add them to the JPanel and then add the JPanel to the screen. Be sure to add a rowlayout manager to the extra JPanel you create and tell it you want 0 pixels between the componets so that your components don't disapear because of the invisible borders.
Sometimes I find that components (especially the JList component don't) display properly, but if you resize the screen even a little they pop into place. I found that if I set the border of the whole window to null and then set it back to what it was the components pop into place as well. I now standardly do thies after I ask the rowlayout manager to buildLayout().
When we are generating a tabbed pane there will be p1Add and p2Add methods that put components into the various JPanels that make up the different tabs.
You can see example in the DataDictionaryEditBuildLayout.java class.